
Have tube, will tie... but how to go about it? How do you actually manage to tie on a tube? Well, it's much like tying on a hook, just different. Learn to tie on plastic, metal, bottles, compound and rear tubes.
Tying on tubes is not unlike tying on hooks. It's actually a bit easier sometimes. But it can also offer some surprising twists. This article tries to prepare you for a few and also covers a small selection of the many different ways a tube fly can be tied.


Tying on plastic tubes
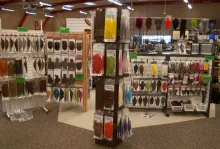
You can buy plastic tubes in precut lengths. Tubes are usually measured in inches, and come in lengths from ½” to 3”. The most usual lengths are 1” and 1½”, which are widely used for salmon flies.
Alternatively you can buy your tubes by the foot or meter, and cut them to any length you please.
I prefer to melt a small collar on the front end of the tube if it's not done already. This can be done by quickly holding it into a candle or lighter flame, letting it curl slightly.
Plastic tubes are easy to handle and when mounted on a large needle, just push the rear end a bit over the eye part of the needle, and it will be pretty secure.
Notice that some plastic tubes compress quite a lot when you tie on them, and more than one tube fly has ended its life helplessly stuck to a needle, the tyer unable to remove it after having finished his fly.

In general the fly is tied all up to the front rim of the tube, while the rear part is left bare to accommodate a piece of soft junction tube. Some tyers prefer to tie on a tube, which hasn't been trimmed or melted in the front. You simply tie the fly on an overlong tube, finish it, trim the thread and then cut the plastic close to the head. Then you keep the materials out of harm's way and melt a front collar, which will curl up to the tying thread. Take care not to apply too much heat, because both thread and other materials will melt and even burn willingly!
There are also tyers who fasten the junction tube to the fly while tying, and cover its base with tying thread. This will secure the tube and make it an integral part of the fly. Some large diameter tubes will accept narrow eye tube hooks directly without a junction tube,
A few tyers tie on very thin plastic tubes, sometimes referred to as micro tubes – much like the inner tube used for the rear tube flies mentioned below. These very slim tubes allow you to tie some very small and lightweight flies, and even enable you to tie more traditional fly patterns on tubes in stead of hooks, while still maintaining a slim fly profile.
Others tie sparsely dressed flies on short and thin plastic tubes meant to be hitched. These will usually have a hole in the side where you thread the tippet through. This will allow the fly to skate over the water, creating a wave that entices the fish to strike.
|
|
|
|
|
|
|
|
|

, epoxy, silicone, glue, suede, foam, Softex or a combination of such materials.")


Plastic tubes also form the foundation for most of the flies that I refer to as lure flies. These are flies, which are built up from materials like foil, epoxy, Softex, glue, silicone, foam or any of wealth of other substances. The flies become more solid and will very often look very much like the things they imitate - mostly baitfish, but also squids and shrimps can be found in this group. Other fies - such as many of Bob Kenly's flies - just don't look like anything out of this planet, but still work very well. The variation in this group of flies is really endless, and new techniques pop up all the time.
Plastic is definitely the most common type of tube and also the one, which is easiest to get a hold of and tie on, and plastic is the place to start if you are new in tube tying.
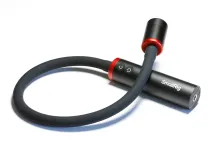
Aluminum, copper and brass
Straight aluminum, copper or brass tubes are in essence the same as plastic tubes once you have them mounted in the vice. Only few of them have a front rim, so you have to take care not to “fall over the edge” of the front of the tube when you finish the head.
The heavier tubes are used for flies meant for hard currents and deep water. Some anglers prefer using a heavy fly over a heavy line or leader and some use both. These heavy flies have been popular fished on sinking lines on long, heavy rods in spring time spate waters with heavy melt-off.
If the metal tube is not lined when you get it, you will need to mount a liner. You can do this before tying, which is easy, but reduces the inner diameter of the tube and limits the tools that can hold it. You can also line the finished fly, which is a bit more troublesome, and demands that you keep wings and hackles well out of the way of the flame.
Whatever you choose, melt a collar on one end of a thin tube, let it set, and pull the liner tube through the outer tube so that the collar fits snugly to the rear end of the outer tube. Trim the inner tube to less than 2 millimeters or less than 1/12th of an inch and melt that to form a second collar. The amount of tube needed to form a collar fitting the outer tube snugly must rely on experiments. Some inner tubes melt more readily than others.
Be careful not to melt the liner to a solid lump, which will block the hole through the fly. Even a tight hole can be an annoyance because it makes the job of threading the tippet through the fly very hard, so if the hole closes, pry it open again with a needle or the mandrel of your tube vise or adapter while it's still soft - or simply melt the collar while the mandrell or needle is still in the inner tube, and separate the two once the plastic has cooled off.
 and a plastic cylinder (right). The visual differences are small: the translucent vs. the shiny tube and the smaller head on the bottle, and there\'s a difference in weight too of course.")


Bottles
Bottle shaped tubes call for some special considerations when tying, and some of them - what I refer to as rear tubes - are radically different from the cylindrical tubes with respect to tying method. I will cover the rear tubes in the next chapter.
Most “traditional” bottles are basically very short tubes with a front taper, which allow you to tie a short and heavy fly. The front part of almost all bottles is thinner than the rest of the tube. A few have more complex shapes, but the front taper allows you to tie a wing, hackle and head on a smaller diameter tube, giving the fly a sleeker look and a smaller head.
You tie the fly on the metal tube itself as opposed to the technique used on the rear tubes mentioned below.
There is an ongoing dispute about rims or no rims in the front end of the bottle tubes. Now deceased Russian Jurij Shumakov dubbed these rims “pig's noses” and removed them on any tube that had them before tying. Strangely enough you can still find some tubes with the Shumakov name that has rims, but that's a whole other story. I personally have no problem with this rim, and the Bidoz tube of my own design has a rim, which I find useful and a help when tying.
|
|
|
|
|
|
|
|
|
|
|
|


 consists of a fly tied on the thin inner tube and a selection of rear tubes to use with it. It allows you to adjust weight and color at waterside.")
The rear end of the bottles can also be reduced in diameter to facilitate mounting of the junction tube that holds the hook. Other bottles and rear bottles have full rear diameter and on these types the junction tube just sits tight against the rear of the bottle. A few large diameter lightweight bottles have a larger hole in the rear where the junction tube sits inside the metal.
Some bottles don't resemble bottles at all, but have all kinds of strange shapes. Finnish Eumer has a crayfish tube, tapered to enable you to tie nicely shaped shrimp and crayfish-like patterns and flies in the Francis and Icelandic Snelda tradition.
The rear tube
The principle in the rear tube or rear bottle - often referred to as the Morrum tube or the US tube – is that the bottle adds weight to the rear and center of the fly, but you tie on the thin inner tube.
This method allows you to tie flies with very small heads and a low and slim profile, and still have the added, concentrated weight of a metal tube.
The tradition is originally Scandinavian, which is why the tubes are often referred to as Morrum tubes, named after the Swedish salmon and sea trout river Morrum. Danish Fly Co, Swedish Loop, Finnish Eumer, Russian Shumakov and many other manufacturers can supply a wealth of these tubes in many sizes and colors – and some odd shapes too.
The method used for tying on these tubes is simple: melt a rim on a thin inner plastic tube and pass it through the bottle from the rear. The inner tube needs to be rigid so soft tube for lining will not work. Let an ample length of tube stick out in front of the bottle and mount the whole thing in a vice.
Tie your fly on the thin inner tube snugly against the bottle, and finish with a small head. Many tyers add a cone to cover the head, hackle and wing butts and to balance the fly. Trim and melt a collar on the inner tube – maybe after having secured the whole construction with super glue or varnish. Other tyers just finish the fly with a small head, and trim and melt the thin plastic tube right in front of it.
The junction tube can either fit on the rear end of tube, be used as a loose buffer, which just rests against the rear of the tube or in some cases slip into the large rear opening of the tube.
Some of these rear bottles are shaped with ridges or grooves, which will allow you to tie on the tube itself. Others have grooves, which allow you to add paint in the grooves and wipe the excess off, obtaining a very nice effect. The variation in the shape of these tubes is if not endless then at least large – and growing larger.
An interesting variation of the rear tube system is the Interchangeable Body Tube System introduced by ever inventive Jurij Shumakov. This system, which was discovered “by accident” because one of Shumakov's friends misunderstood the traditional rear tube tying method, is actually quite simple: tie a fly on the thin inner tube, and slip any type of rear tube you want to use over the rear part of the thin tube extending behind the wing and hackle of the fly, and press it up behind the materials.
The line pulling on the hook through the tubes will hold the fly firmly together, and the whole setup will allow you to change it and use any rear tube you want with one single wing and hackle section.


Tubes and cones
The above style of fly introduces the cone head, which has become an integral part of many tube patterns. The cone will add weight and style in front of the fly, and oftentimes cover the thread wraps that form the head as well as helping a front hackle sweep nicely backwards.
In Scandinavia the cones have become such an integral part of almost all patterns, and you rarely see larger contemporary tube flies without.
The cones come in largely the same materials as the tubes themselves: plastic, aluminum, brass and tungsten. Copper cones are sometimes seen, but they are mostly just aluminum with a surface coating. The cones can be found in numerous colors - painted or anodized.
A fairly new trend in cones is the very wide dish-shaped cones introduced by Swedish and Finnish tyers. They are mounted in the same way as the conventional cones, but are shorter and wider, providing the fly with a massive head that will move a lot of water.

Another novelty – not surprisingly also from Russian Jurij Shumakov's hands – is stacking cones on a thin tube with hackles in between. Shumakov called in The Russian Bullet. This allows you to build some nicely colored, voluminous and at times very heavy flies. You can imagine the weight of a fly using three or four tungsten cones. A friend of mine has tied a very compact salmon fly in this manner, which weighs in at 2.7 grams or very close to 1/10th of an ounce!
An almost similar concept that rests on the rear tube idea, but uses more commonly available beads has been devised by Swedish Ulf Sill, who will use one or several large metal beads in the same manner as a rear tube or the above stacked cone system. This will give you yet another variation over the rear tube theme.


You can study the different styles of tube flies in this article.
- Log in to post comments


I agree with Tucker;
I agree with Tucker; many thanks.
Laurie,
Tie the
Laurie,
Tie the materials on the thinner 'bottle neck' end. It will help if you place some varnish/glue on this area before wrapping the start of your tying silk, as otherwise the silk wraps may spin, and this method gives additional security of the silk to materials anyway.
Mike
Hi,
Just purchased
Hi,
Just purchased loop bottle tubes, what end do you tie the fly on, the thin narrow end, or the thick end.
Plastic tube that holds hook appears not to go over thick end.
Thanks Laurie.
WOW, this is the bes
WOW, this is the best summary I have ever seen on the inner workings of tube flies. Magnificent article and diagrams, Martin. I am grateful for the time and effort you put into these articles. Thank you for sharing this very useful information.