
Wing Things ™ By Don Ordes Streamer Wing & Cheek Pairing System Sometimes good things don't have to cost a lot of...
Wing Things â„¢
By Don Ordes
Streamer Wing & Cheek Pairing System
Sometimes good things don't have to cost a lot of money, and this is one of them. I enjoy tying streamers, but they are only one of dozens of types of flies that I tie, so sometimes there is a lot of time between tying them. Because of this, I not only needed a system where I could design my streamer matched wings, cheeks, and other materials, but I needed to be able to store it at the point I left off and be able to pick it up there when I started again. It had to be organized yet flexible, and easy to maintain and expand without much expense. So step by step I came up with this system.
I needed a way to hold groups of feathers together until I needed them. Any permanent binding wasn't feasible, so I modified a method I used while pairing giant feathers for my 14/0 Fantasy Flies, just downsized. Instead of using milkshake straws, I used coffee straws, which were very cheap by the box. I only need short lengths, so each straw makes plenty of holders. I didn't want to crush the feathers when I inserted them, so a slot did the trick.


I start by going through my capes and picking left bending hackles, right bending hackles and neutral hackles. I trim the butt ends before sticking each group into a Wing Thing. this organizes the feathers so I can quickly select the right hackle. If I need a lot of one type from a cape, I'll increase the size of the straw. I may pick groups of large, medium, and small hackles for different size streamers.
It sounds like some work before I actually get tying, but my frustration was always that I thought I could have done better on each fly, but when it was finished, I wasn't satisfied and I had to start over to do better. I needed a way to design a fly with the best of what I had before I ever tied it to a hook. I wanted to be able to experiment with colors, layers and staggering. Then i wanted to add shoulders cheeks, hairs, and then play with variations before I had tied them to the hook.
I have over a hundred streamer capes to choose hackles from, and I like being able to mix and match from all of them. I also have many bird skins and different feathers to use as cheeks and shoulders. I pick groups and pairs of these in sizes and set them in Wing Things until it comes time to match them up with the hackle wings.
This system allows me to design flies using everything I have, and the system makes up for the time spent preparing once I get to actual tying. The end results justify the work, plus I can put it all away and pick up exactly where I left off. I save a lot of time not having to set up each time. With the Wing Thing card filled, I can tie 100 streamer flies without going back to capes and skins, having well designed plans for all of them.
Here's how each one works

Begin by matching hackles (lefts and rights) from your pre-sorted bunches. You can use it for classic patterns, or experiment and match up and layer a set of wings you like. This is especially convenient for commercial tyers to assemble a large quantity of wings before hand.

Cut the wings down to size, and be sure to leave a bit extra space so you can strip off a few fibers at the tie in point. A chart of your hook stock will help you determine the length to cut the hackles to (see below). You can also mark the feather length down on paper

Insert matched wings into a Wing Thing by pinching just past the slot. Notice that the barbs go into the slots, friction holds them there, and the don't get crushed.
You can now mix and match cheeks or you set this set on the Winger rack until you are ready to put shoulders and cheeks. I play around with layered cheeks and use a lot of bright blue peacock fans. But I get to see the finished fly long before I lash it down.
Try out some cheek feathers or some special effects. Just slide the barb into the edge of the Wing-Thing and you can see what the finished fly will look like. Again, you can continue, or set it in the rack to continue later. I have so many ideas popping into my head that I just sit it in the rack and try another design.

The Wing Thing allows me to experiment with basic layered wings to add additional staggered hackles and under-lying alternate colors and markings.


Here I experiment with a shorter blush-red hackle. Here I have the short blush over layed with a dark hackle to mute the transition. I snipped the ends and slid the hackles in with the wings. Now I can set it asode of take a look at some cheek combinations. If I like what I see, I slide the cheeks in both sides and set the wing-set on the spikes (see spike pad below). I still have opportunities to make changes or additions as I play with other designs.

As I experiment and build up wing-sets I like, I take all of them and set them on the spikes. A commercial tyer using the system will find it an easy way to store wings as they are ready. The spike blocks can easily be made from a Styrofoam block and heavy pins. For a more ambitious block, a wood base could be drilled out and fitted with short dowels to fit the straws. You may want to keep things orgaized by having seperate blocks for cheek sets, wing sets and ready to go sets.


I keep a stock of pre-tied shanks in different colors just to see what the wing will look like on a hook shank. Most times I see the need to wrap a new shank just to match a new wing combo.

Once I have a wing completed and a body chosen, I can play around with the finishing touches. For the belly, I can use bucktail, polar bear, squirrel, goat or Lady Amherst tail. The eyes could be the standard jungle cock, or I could try tragopan or peacock pheasant for a bit of a twist on the traditional.

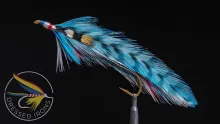
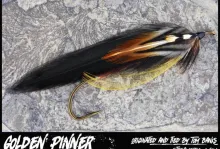
Using this system, I can easily store it away when I need to make room for another project. It really aids in the creative process. Commercial tyers may find it handy to keep their tying space organized. I hope that you enjoying checking out my process. Don't forget to also check out my streamers I have tied (using Wing Things) for the Streamers365 project.

- Log in to post comments


Comment to Wing Things
Don, thank you for this inexpensive and innovative tip, it will certainly help me along my quest to become a better fly-tyer. Currently I have wings all over the place, and this organizational method will help to alleviate confusion and congestion. Wow !
Gray
Comment to Wing Things
Don , That is fantastic. I would have never thought of using straws ot store my streamer wings. I have been tying flies for 45 years give or take a week. You bet I will be teaching this to my tying classes from now on. Thank you....
Comment to Wing Things
All I can say is, WOW! This single article has opened up an area of tying that until this morning has not even been a concern in my tying ever! I'm 62 and have fly fished for over 50 years and tied my own flies for most of that time. Living in the inland area of Eastern Washington state where I live it is quite possible to fish all open waters with about 12 flys, needing only to vary the size and color combinations of those 12.
So this article is an eye opener even tho I knew the basics of this type of wing the specifics are simply amazing when seen in detail. Thank you for opening my eyes a little wider about this style of fly patterns.