
The traditional method of "stacking the stems" did not work for me right from the start. The wing would have a tendency to roll and make me very...
The traditional method of "stacking the stems" did not work for me right from the start. The wing would have a tendency to roll and make me very frustrated after I had spent an hour getting the chassis (as I call it) ready so I could set the wings. I tried many things even to go as far as building the area on top of the shank with strands of peacock herl, stripped. This would make an oblong shaped head, which made a flatter surface to set my wings but made a weird looking head.
So I had contacted a fellow Rangeley Style enthusiast and asked how he got his wings to set where he wanted them. He said "I don't glue them, I take the first feather and tie it in at 11 o'clock, take the second hackle feather and tie it in at 10 o'clock, and so on. BING!! A light went off, how am I suppose to put one circle on another circle and get it to stay where I want by wrapping thread (which pulls the materials when securing) around it? Physics will tell you that depending on where you set the circle (stem) on the other circle (hook shank & thread wraps), that depending on which spot you mount your wings (high or low), it will also change where the stem touches the hook shank. That makes for a huge number of variables that for one, I don't have the time for, and two, creates frustration. Now there are exceptions to the rule. Some people can finish their chassis with the same amount of thread and same taper, everything. That's not me, but I am pretty consistent.
I soon got to work and came up with this new technique. I hope it helps you improve your tying! I know it did for me.
The glue I use is Elmer's Craft Bond Rubber Cement. Don Bastian uses it and has tested it in water, plus it dries clear so you can put some between the wings to stiffen it up like Mrs. Carrie G. Steven of Rangeley, Maine.
 The traditional way of gluing Rangeley Style Wings, I am not sure if there is a name for it but I call it "stacking the stems". So when you stack the stems, you only create one point of contact. Ever tried standing one two balls stacked on top of each other? No, because you would probably get hurt before you could even stand up straight. Obviously not very stable.
 When you hold in place your preassembled wing, wrap your thread and pull to secure. The wing furthest away always rolls clockwise if your looking at the eye of the hook. The same happens to the wing closest, it too rolls clockwise and you end up with tilted wings or a lot of adjusting to hopefully get the wings straight.
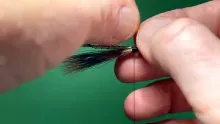
 This is how I glue my wings, #1 is the inside saddle hackle, #2 is the outside saddle hackle, #3 is the shoulder feather, and #4 is jungle cock. When you preassemble your wings like this, it gives you two contact points. Two contact points make for a more stable setting of the wings while securing.
 To the actual gluing of the feathers. This illustration I used turkey feathers to emphasize the stem of the feather. This wing would set on the near side if you tie right handed. First, lay the inside saddle hackle on you table just like mine. I glue the stripped stem and all the way up the stem to just before where you shoulder will end. Remember, those streamers without shoulders you should pay a little more attention to how much glue and where. Once you have put glue on the inside saddle hackle, just place your outside saddle hackle or #2 feather stem just below the stem of feather #1. Make sure the two stem run parallel, it's awful hard to straighten them once the glue sets.
 This shows the glued stem ends that will contour you hook shank & thread wraps.
 This photo show how to glue the far side wing. Just repeat previous step accept when you set the outside saddle hackle or #2 feather, it is going to go on top of the stem instead of the bottom. When you lay the inside saddle hackle or #1 feather on your table just like the photo. After you glued #1, take your #2feather and place it above the stem of feather #1. Make sure it runs parallel to the stem of inside saddle feather. Seventh Photo Caption: This shows the glued stem ends that will contour you hook shank & thread wraps. This would be for the far side wing.
 I used a shorter turkey feather for the shoulder in my example to make it easier for you. Now you want to glue your stems of one of your wings and just a little up into the feather to hold the shoulder in line with the #1 and #2 feathers. Once you have glued those area's, place you shoulder in the little notch that feather #1 and #2 create when you previously glued them. You may have to manipulate it with your fingernail or a tying tool like a bodkin when you have to separate the stems. I know this may sound like more work but it is worth it in the long run and you will eventually get quicker at it.
 A photo showing where I place my shoulder stems, right where the pen is pointing. This wing is for the near side.
 Just a photo of what the near side wing would look like to a right handed fly tyer.
 This is where you place the jungle cock nail. Now if your quick enough you can set you nail right on top before the glue dries from the shoulder. I recommend adding a little more glue right in the same spots as the shoulder, some the stem and some just a smidgeon into the shoulder feather. Not much because you don't want it to squeeze out the side of the JC nail. Then you got a little mess.
All in all, I hope this new method helps many of you solve the problem I encounter when I started tying Rangeley Style. Please feel free to contact me if you have any questions. This is the first time doing and instructional so I hope I have made it easy to understand. Thank you for reading my instructional. May god bless everyone and have a wonderful 2015!
Stanley Wilfred Williams
Stan's Streamers
Howland, Maine
- Log in to post comments

Comment to Preventing Wing Roll in Traditional Fea
I would say your main problem was pulling the thread down on the same side as the wing is mounted (as pictured) rather than the stems being stacked and rolling. By pulling down, the main force is concentrated on the stems, but if you made a full loop and pulled up vertically, the main force is concentrated on the shank of the hook and the subsequent loop around the stems compresses down around the point of contact with the stems, thus not rolling them. Same would be applicable for the opposite wing, where you would make a full loop and still pull up, the primary force being concentrated on the under side of the shank
The exact same principle applies for mounting married wings on streamers, trout and salmon flies.
I also think, in my experience the widths of the stems of different feathers are for the most part, the same at the tie in point with an difference not being significant, unless you using genetic cape feathers (rather than saddle feathers),
The other alternative is to crush the stems at the angle you want them mounted on the side of the hook,, so they all end up flat against the shank (
everyone has a different way of doing things, none of which are wrong, but thread control is the deciding factor.
Comment to Preventing Wing Roll in Traditional Fea
I agree , I use a pair of needle nose pliers and flatten the stem at the tie down area. Glue and me don't get along well.
Comment to Preventing Wing Roll in Traditional Fea
Thanks for sharing your methods on here Stanley. I'm impressed at the depth and approach that you take in your streamer tying. I'm also in the flatten the stem with pliers group when needed. I really do like the idea of offsetting the stems and will give this a try on the next sets I glue up.
Comment to Preventing Wing Roll in Traditional Fea
I didn't go into depth with my thread on the illustration because I guess I overlooked it. I usually do set the wing by pulling my thread vertically but actually did this in a short time. I have to provide for my priorities and can't spend much extra time on details. Thanks for your comments! This is for everyone in general. If your an traditionalist and want to glue your wings together by stacking them or crushing them and don't want to change. It's fine, but maybe just try it (if you have time) you might just like it or scrap it. Also I probably have the worst hands to mount wings that is why you see the gloves. So those loop and pull vertical while holding your wing and thread in left hand in impossible unless I have gloves. Dry winter is brutal on my both my hands, I can't do what Sharon Wright does in her book with the nail file. Thanks for the comments guys, have a great week Darren, Larry, and Eunan!