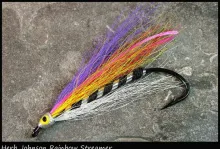
Lake Erie Shiner is a Killing Bucktail from the vise of Floyd Franke
A good combination of colors and a subtle use of flash make the Lake Erie Shiner a deadly fishing pattern.
Proof that you don't need a lot of fancy materials to tie a very effective fishing fly.
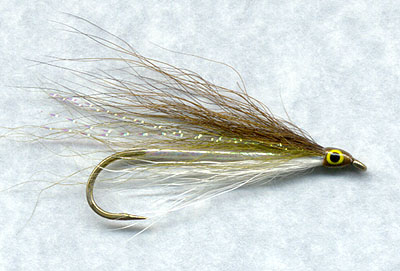
Those of us fortunate enough to live in the Mid-Atlantic states of America's East coast are lucky enough to have at our disposal a free publication named The Mid-Altantic Flyfishing Guide. It was in this magazine that I first saw the Lake Erie Shiner.
A product of the vise of Floyd Franke, a respected and accomplished fly tyer from the heart of the Catskills, the photo and story behind this fly made an immediate impression on me.
It's not my story to tell, but let me just say that Floyd developed this fly to serve as an imitation of a common trout bait the Lake Erie shiner years after he observed some fisherman easily taking their limit of trout using real minnows in his home trout waters.
What caused me to consider the fly more than a pretty picture in a magazine was seeing a few of the real flies at a flyfishing show in New Jersey. Floyd had a tying table at the show and had a few of these flies on display. What the black and white photo in the magazine failed to show was the lifelike combination of colors in conjunction with the subtle flash of the body and the wing. I knew then and there that I would add this fly to my boxes and I was quite sure it would be terrifically effective. I was right on both counts. This has quickly become one of my "go to" flies when trout and smallmouth bass fishing. It is, by far and away, my favorite bucktail pattern.
A word about materials. The flies I saw in NJ were tied with a fluorescent floss underneath the pearl tinsel. If you want to go that route, Gordon Griffith's makes a very bright floss called "Super Glo" which is available in white as well as the more traditional fluorescent colors. I tie mine with white uni-stretch which I hold in a bobbin and use as thread for the initial tying procedures. For me, it greatly simplifies and quickens the tying procedure. After I wrap the pearl mylar over the body, I cover it with a coat of clear nail polish to help protect it from fish teeth. I tie up a batch of bodies in a sitting, usualling rotating through them all when I'm done adding a second coat of nail polish. Typically when I've finished the last, the first is dry enough to begin tying the remainder of the fly.
As far as belly and wing materials, if you are blessed with a very fine bucktail that is not too crinkly, then count yourself lucky. I opt to use white "kid goat" for the belly hair since it's fine and fairly straight and, unlike bucktail, fairly uniform from patch to patch. I am blessed with a good olive bucktail with fine hairs. I am so taken with this fly that I reserve the bucktail for this pattern alone. It supplies both the olive portion of the wing as well as the olive brown portion, which is taken from the middle (brown) portion of the tail. It will be a sad day when I tie the last fly with hairs from that piece, as I know a replacement will be mos difficult to find.

Painted eyes might not make a bit of difference to the fish, but they make a world of difference to my confidence in the fly. I think they are worth the effort.
If you don't believe in painted eyes, by all means leave them out, but if you're on the fence, take the time and add the eyes. The only streamers I tie without eyes anymore are featherwings that use jungle cock. All my bucktails and marabou winged flies have painted eyes. I first coat the head with two or so coats of clear nail polish to seal the thread thus preventing the paint from bleeding and ruining the circular effect we're after. I also use acrylic paints, which seem far more compatible with nail polishes and other head lacquers than the model paints most folks use. I dab the eyes with the ends of a 1/4" dowel that was sharpened in an electric pencil sharpener to various diameter points. The final coat or two of nail polish
protects the eyes and gives the head a smooth glossy appearance. Painting eyes is not the kind of thing you can finish all in one sitting, so most people simply don't bother. I feel it's worth the work.
Quick confession - I do not use the light blue hackle that Mr. Franke specified in his original pattern. The first time I tied the fly I plumb forgot it and it did so well for me that I decided not to temp fate and I simply continued to tie them in the same way. I also substituted pearl krystal flash in place of Mr. Franke's preferred olive for the simple reason that I don't have olive krystal flash. While I don't usually condone wanton substitution or omission of ingredients in fly patterns, I believe I've preserved the essence of the fly with my version and I hope Mr. Franke wouldn't object terribly to my changes.
Trust me on this one. This is a great fly. Unless you're squeamish about fishing streamer flies, give this one a try. I'm sure you will not be disappointed.
| Hook | Streamer 6xl, #6-#10 |
| Thread | Olive Danville 6/0 |
| Body | Pearl Tinsel wrapped over White Uni-Stretch |
| Belly | White Bucktail or Goat |
| Throat | Light Blue Hackle Barbs, half as long as the belly hair |
| Wing | Olive Bucktail topped with Olive Brown Bucktail |
| Flash | Pearl or Olive Krystal Flash, just a few strands |
| Head | Olive, Yellow Eyes w/ Black Pupils |
Tying Instructions:
- Using a bobbin, begin wrapping a layer of white Uni-Stretch from behind the head toward the bend. Before reaching the bend, begin wrapping over a section of pearl tinsel which will serve as the overbody.
- Wrap the Uni-Stretch to the bend of the hook and return to the head area, making even wraps to keep the body as smooth as possible.
- Wrap the pearl tinel forward over the white floss making smooth and even turns. Tie off behind the head. Whip finish and cut off the un-stretch.
- Coat the body with high gloss nail polish (Sally Hansen's Hard and Nails is a good choice) and set it aside to dry. I usually tie up a batch of bodies ahead of time so that the first will be dry when I set the last aside.
- Tie in a small bunch of white bucktail or goat beneath the hook shank so that it extends into but not beyond the gap of the hook.
- Tie in a small bunch of soft light blue hackle beneath the white bucktail extending about halfway the length of the belly. (As stated above, I usually omit this ingredient on my flies).
- Tie in a small bunch of olive bucktail on top of the hook so that it extends to the back of the bend or just slightly beyond. Trim the butts at an angle to fasciliate the forming of a bullet shaped head.
- Tie in a couple strands of krystal flash. Just a few. You don't want the flash to dominate the wing but rather add a subtle highlight and sparkle.
- Tie in a bunch of olive brown bucktail (I use the brown portion of an olive dyed bucktail) on top of the wing so that the length is as least as long as the olive portion, or just slightly longer.
- Wrap a neat bullet shaped head with smooth turns of thread.
- Apply a coat or two of nail polish to the head to seal the thread and create a smooth foundation for the painted eyes.
- Dab on a dot of yellow acrylic paint for both eyes and set aside to dry.
- Dab on black acrylic paint for the pupils of each eye and set aside to dry.
- Finish the fly by adding a couple more coats of clear nail polish to protect the painted eyes and provide a smooth glossy finish to the head.
- Log in to post comments