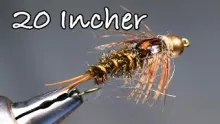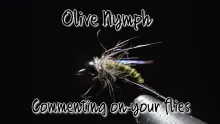
The story about how the Toothpick Stone Clinger was inspired by turning over rocks and taking pictures

Sometimes when the fishing is a bit slow, or I'm waiting for a hatch to start, I'll put the rod down and go and turn over some rocks. It can be an interesting interlude to see what's hiding underneath and maybe take some pictures. It's not easy to get a good shot with a macro lens holding the camera in one hand and a rock in the other. There's always a good deal of manoeuvring to get the lens three inches from the subject to get maximum magnification while avoiding camera shake. It's usually just at that moment that the little critter decides to walk out of frame. Most shots get deleted, but now and again there's a decent one that gets to stay in my Lightroom library.
The rivers I fish have a number of species of stone clinger nymphs, March Browns and Brook Duns being the most common. The image of one of them was taken a couple of years ago and has served ever since as the inspiration for many attempts at designing and tying a good imitation.


The key feature of stone clingers is that they have a flattened profile. If they didn't, they would have a hard time actually clinging to any stones. Therein lies the first problem for designing an imitative fly; the art of tying is essentially wrapping stuff around a hook which produces a round body and not a flat one.
The second issue is that their eyes are on top and not on the sides as in other upwing nymphs where they can be imitated with a piece of melted monofilament tied in behind the hook eye. Plastic gems are the solution. These can be found in craft shops and come in a range of colours and sizes down to 1mm, which are ideal for adding little eyes to flies.
As well as seeing, nymphs need to breathe, and stone clingers array their gills along either side of the abdomen behind the flattened body. Another material from a craft shop comes into play here in the form of embroidery floss. Knotting strands of floss along the hook shank and then trimming the ends short produces fluffy tufts which stick out sideways from the abdomen, just like the gills of the nymph. DMC rayon floss is the same material I use for the legs on my Hitched Hoglouse and the clove hitch knotting method is exactly the same.
So, the gills and eyes are sorted out, and the tails are old school pheasant tail fibres. But what about the flattened body? It is the defining feature after all. The solution was at hand – a wooden toothpick. I've used these for a long time to apply UV-resin to flies as the narrow tips allow precise placement. I put a small drop of resin on a Post-it note stuck to my tying bench and pick up small drops on the end of the toothpick. When I'm finished a quick blast of the residue with a UV torch cures the resin before I drop the paper and toothpick in the bin.
A short piece of toothpick tied in behind the hook eye forms a scaffold over which to fold a length of organza ribbon to produce a flattened tapered body. The folded ribbon has openings on the sides for the legs and the eyes can sit nicely on top where they are supposed to be.
Nick Thomas


- Log in to post comments